2008年11月3日 星期一

一個控制項繫結多個欄位

WPF隨手筆記

WPF 的資料繫結允許多個欄位與一個控制項繫結, 使用以下步驟說明:

  1. 撰寫一類別, 實作IMultiValueConverter介面, 處理多個欄位連接成一個值的作業
        public class NameConverter : IMultiValueConverter {

    public object Convert(object[] values, Type targetType, object parameter, System.Globalization.CultureInfo culture)
    {
    string name;
    name = values[0] + " " + values[1];
    return name;
    }

    public object[] ConvertBack(object value, Type[] targetTypes, object parameter, System.Globalization.CultureInfo culture)
    {
    string[] splitValues = ((string)value).Split(' ');
    return splitValues;
    }

    }


  2. 在Windows.Resource宣告這個類別為資源
        <Window.Resources>    
            <c:NameConverter x:Key="NameConverter"/>
            <ObjectDataProvider x:Key="NorthwindDataSetDS" ObjectType="{x:Type WpfDataBinding:NorthwindDataSet}" d:IsDataSource="True"/>
        </Window.Resources>

        <Window.DataContext>
            <Binding Path="Employees" Mode="Default" Source="{StaticResource NorthwindDataSetDS}"/>
        </Window.DataContext>


  3. 在控制項要繫結的屬性上使用MultiBinding設定Converter及繫結的欄位
    <TextBox Margin="32,80,69.6,0" VerticalAlignment="Top" Height="48" TextWrapping="Wrap">    
                <TextBox.Text>
                    <MultiBinding Converter="{StaticResource NameConverter}"
                        ConverterParameter="FormatLastFirst">
                        <Binding Path="FirstName" />
                        <Binding Path="LastName" />
                    </MultiBinding>
                </TextBox.Text>
            </TextBox>


繫結Northwind的Employees Table, 執行結果:


1

2008年10月31日 星期五

繫結多個不同的集合

WPF 隨手筆記

在WPF 裡若有多個來源 (不同的集合或Table...) 想列在一個清單裡, 除了寫程式之外, 有更簡單的方法嗎?

答案是使用CompositeCollection 類別.

  1. 先定義資料來源

    Window.Resources定義資料來源SuperStarts是一個集合類別, HistoryHeroesData 是一個XML內容

    <Window.Resources>       
    <c:SuperStars x:Key="SuperStartsData"/>
    <XmlDataProvider x:Key="HistoryHeroesData" XPath="HistoryHeroes/Hero">
    <x:XData>
    <HistoryHeroes xmlns="">
    <Hero Name="關公" />
    <Hero Name="花木蘭" />
    <Hero Name="成吉思汗" />
    <Hero Name="岳飛" />
    <Hero Name="文天祥" />
    <Hero Name="鄭成功" />
    </HistoryHeroes>
    </x:XData>
    </XmlDataProvider>

    <DataTemplate DataType="{x:Type c:SuperStar}">
    <TextBlock Text="{Binding Path=Name}" Foreground="Blue"/>
    </DataTemplate>

    <DataTemplate DataType="Hero">
    <TextBlock Text="{Binding XPath=@Name}" Foreground="Green"/>
    </DataTemplate>
    </Window.Resources>


  2. 資料繫結, 使用CompositeCollection

    CompositeCollection裡使用CollectionContainer定義資料來源


    <ListBox Name="myListBox" Height="300" Width="200" Background="White">       
    <ListBox.ItemsSource>
    <CompositeCollection>
    <CollectionContainer Collection="{Binding Source={StaticResource SuperStartsData}}" />
    <CollectionContainer Collection="{Binding Source={StaticResource HistoryHeroesData}}" />
    <ListBoxItem Foreground="Red">Other Listbox Item 1</ListBoxItem>
    <ListBoxItem Foreground="Red">Other Listbox Item 2</ListBoxItem>
    </CompositeCollection>
    </ListBox.ItemsSource></ListBox>


執行結果:


執行結果


SuperStar是一個類別檔, 以下是它的原始程式:


using System.Collections.ObjectModel;
class SuperStar
{
public string Name{ get; set;}
}
class SuperStars : ObservableCollection<SuperStar>
{
public SuperStars():base() {
Add(new SuperStar() { Name = "劉德華" });
Add(new SuperStar() { Name = "張曼玉" });
Add(new SuperStar() { Name = "劉嘉玲" });
Add(new SuperStar() { Name = "梁朝偉" });
}
}


參考來源: http://msdn.microsoft.com/en-us/library/system.windows.data.compositecollection.aspx

2008年10月26日 星期日

如何在VS 2008對預存程序偵錯

如果要在VS2008 直接對預存程序偵錯的話,

直接使用伺服器總管用有權限的帳號連到資料庫, 然後開啟該預存程序設定中斷點按右鍵選Step Into即可開始偵錯.

這個很簡單.

可是如果要對ADO.NET 的程式碼一路進行偵錯到預存程序, 那麼就必須要有幾個條件了!!

  1. 伺服器總管連到資料庫, 開啟預存程序, 在預存程序設定中斷點.
  2. 在程式碼執行預存程序的位置設定中斷點
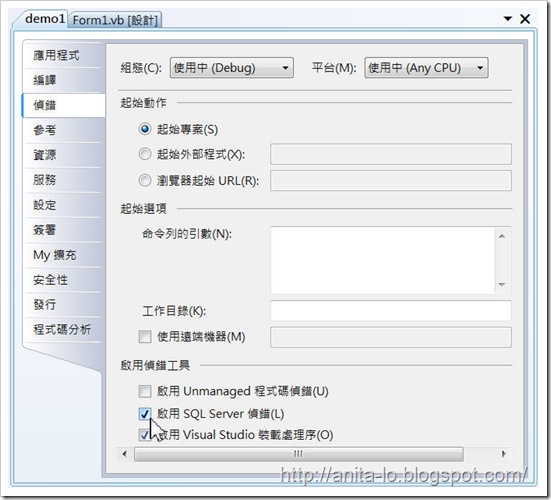
  3. 在專案屬性設定, 啟用SQL Server偵錯

    1

  4. 伺服器總管那個連線上, 設定應用程式偵錯

    2

2008年10月18日 星期六

如何控制內容物件的位置及大小

WPF 隨手筆記

Canvas

是一個很像傳統Windows Form設計的容器, 控制項放進去時使用Top, Left決定物件的位置, Width, Height決定物件的大小.


Grid

很像HTML的Table, 可以將控制項放在格子內, 如果將Grid以單格使用, 效果很像Canvas.

不過, Grid是內的控制項可以使用Width, Height, Margin, HorizontalAlignment, VerticalAlignment屬性來決定控制項的位置及大小.

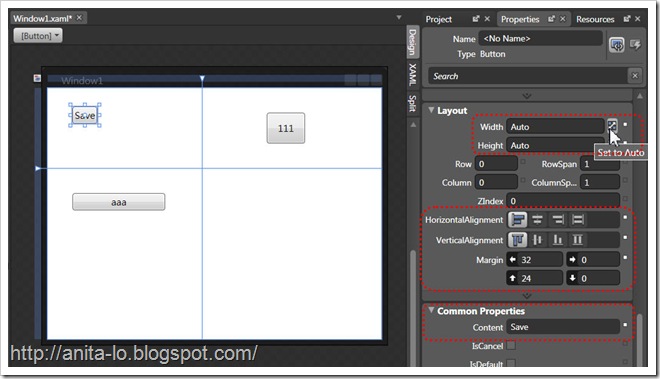
  1. 當Width及Height沒有設定或為Auto時(同時HorizontalAlignment, VerticalAlignment屬性不是Stretch時)控制項的大小會依據控制項的內容決定, Ex.Button的Content屬性的大小.
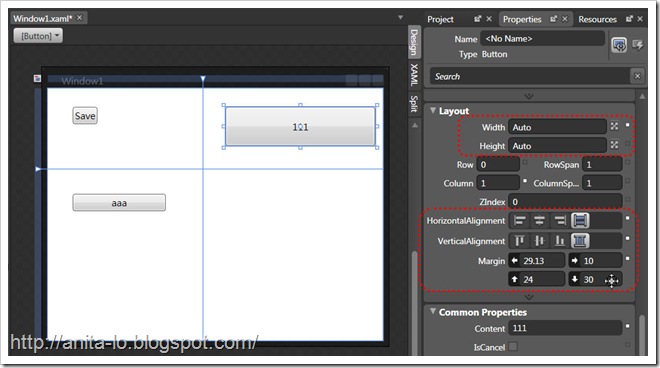
  2. HorizontalAlignment, VerticalAlignment屬性, 如果控制項的Width, Height沒有設定或者為Auto, 這兩個對齊屬性設定成Stretch也會影響控制項的大小, 同時Margin的Right及Bottom對於大小也會有作用, 例如Button設成Stretch以及Margin的Right及Bottom都設為10, 那麼Button會擴展到與右下邊界距離10的大小.

第一種情況: Save按鈕的大小依據內容大小決定.

第1種情況

第二種情況: 111按鈕, 根據水平垂直對齊方向為Stretch擴展大小, 同時與格子的右邊界維持10, 下邊界維持30.

第二種情況

在使用Expression Blend時用到Grid做為LayoutRoot, 在視窗的左上方會有一個按鈕, 可以切換Layout mode, 有兩種模式:

  • Grid is in Canvas layout mode
  • Grid is in Grid layout mode

in Canvas layout mode

上面兩張圖都是在這種模式下, 選取物件時, 只會出現物件的邊界選取圓點, 可以利用這些選取圓點拖拉物件的大小.

in Grid layout mode

按視窗的左上方可以切換兩種模式

切換layout 模式

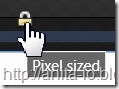
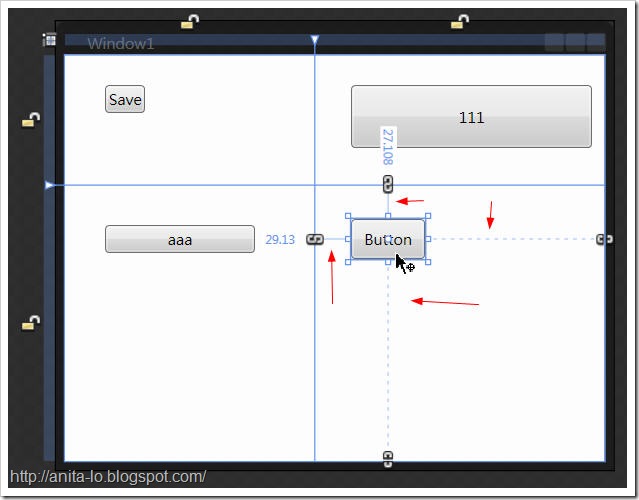
在Grid layout mode 時Grid的Column及Row的上左方會有如下三種圖案, 代表Column或Row計算大小的方式

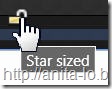
Star Sized Pixel sized Auto sized

在選取控制項除了四邊的控點之外也會有與邊界距離的實線或虛線, 實線代表HorizontalAlignment, VerticalAlignment屬性的對齊關係, 上頭的數字則是Margin屬性的數字. 你可以發現實線上頭有數字, 虛線上頭沒有數字代表Margin的那個相對邊值為零.

7

2008年8月23日 星期六

VB 的Windows 應用程式程式架構

想要使用VB提供的應用程式架構, 但又想自己控制初始執行表單的順序...

這是上課時同學問的問題.

他的問題細節是這樣的, 要先有一個登入視窗, 通過登入流程之後, 顯示SplashScreen 之後才是MainForm.

過去我們會將這程序寫在Sub Main, 然後專案的"啟動表單"指定成為Sub Main.

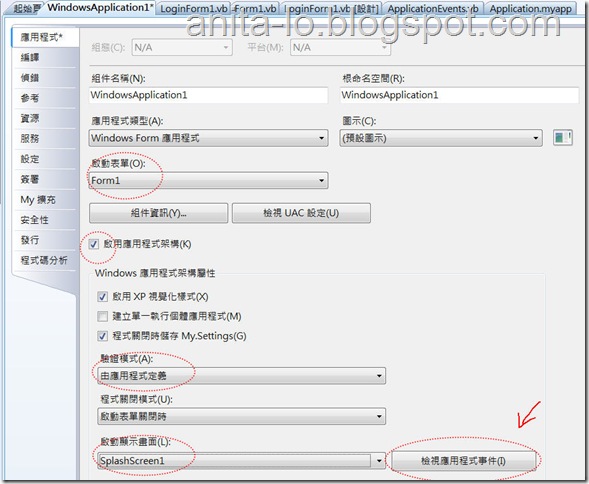
但是在Visual Studio的Visual Basic專案, 若要指定Sub Main必須將"啟用應用程式架構"停用, 這代表無法享用Visual Baisc提供的應用程式架構, 這個同學的需求中又需要用到這個架構, 該如何解決這問題呢?

測試了一下, 我的解決方案如下:

Step1.使用 "檢視應用程式事件"

1

Step2.在ApplicationEvents.vb 覆寫 OnInitialize 方法

Protected Overrides Function OnInitialize(ByVal commandLineArgs As System.Collections.ObjectModel.ReadOnlyCollection(Of String)) As Boolean 

    LoginForm1.ShowDialog()

    If User.IsAuthenticated Then 
        Return MyBase.OnInitialize(commandLineArgs)

    End If

End Function


使用User.IsAuthenticated 檢查是否通過驗證, 如果通過驗證才繼續初始化(呼叫 MyBase.OnInitialize(commandLineArgs) ), 如果未呼叫MyBase.OnInitialize的話, Application不會繼續初始化, 應用程式就會自動結束.


完成!!


A1: 為什麼要覆寫OnInitialize 而不寫在Statup 事件?

Q1: 因為Statup事件已經啟動SplashScreen, 不符合要先Login 再進SplshScreen 的需求. 而且無法控制登入失敗要終止程式(無法呼叫Application.Exit方法)


A2: 怎麼寫LoginForm1的程式?

Q2: 以下步驟解說:


     step1: 加入新項目, 選取"登入表單"

     step2: 允許兩次登入失敗, 宣告變數記錄


Dim errorTry As Short = 0


    step3: 修改OK 按鈕的Click事件如下: (要Imports System.Security.Principal)


Private Sub OK_Click(ByVal sender As System.Object, ByVal e As System.EventArgs) Handles OK.Click  
    Dim roles() As String
    If Not CheckUser(UsernameTextBox.Text, PasswordTextBox.Text, roles) Then
        errorTry += 1
        If errorTry >= 3 Then
            Me.Close()
        End If
        Return
    End If
    Dim iden As New GenericIdentity(UsernameTextBox.Text)
    My.User.CurrentPrincipal = New GenericPrincipal(iden, roles)
    Me.Close()
End Sub

  在登入成功之後, 設定My.User.CurrentPrincipal, 就可以讓User.IsAuthenticated 回傳True.   


    step4: CheckUser 方法是寫檢查帳號密碼的程式, 請自行設計, 下列程式僅供參考.


Private Function CheckUser(ByVal Username As String, ByVal Password As String, ByRef Roles() As String) As Boolean  
    If String.IsNullOrEmpty(Username) Then
        Return False
    End If
    Roles = New String() {"Users"}
    Return True
End Function

2008年8月15日 星期五

ASP.NET 3.5 sp1 新增的 Dynamic Data網站

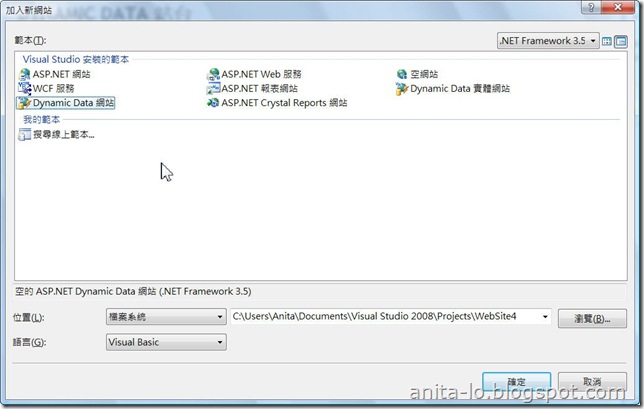
Visual Studio 2008 sp1 在建立ASP.NET 網站的範本中多了"Dynamic Data網站"Dynamic Data 網站範本

又是一個令人 "哇!" 的功能, 簡單來說, 建立網站之後, 他只需要做三個步驟就可以完成網頁資料表的"新刪修"功能.

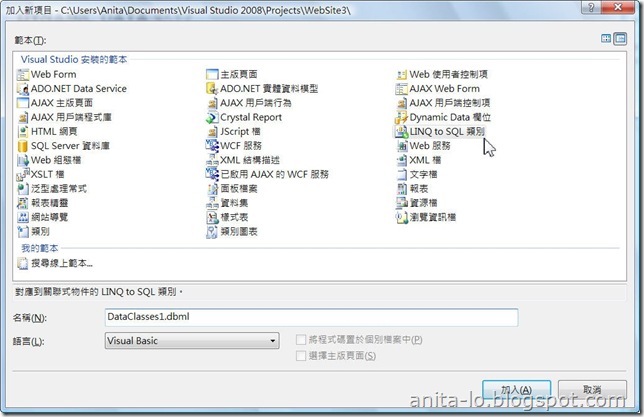
1. 加入新項目 "Link to SQL 類別"

選擇Link to SQL

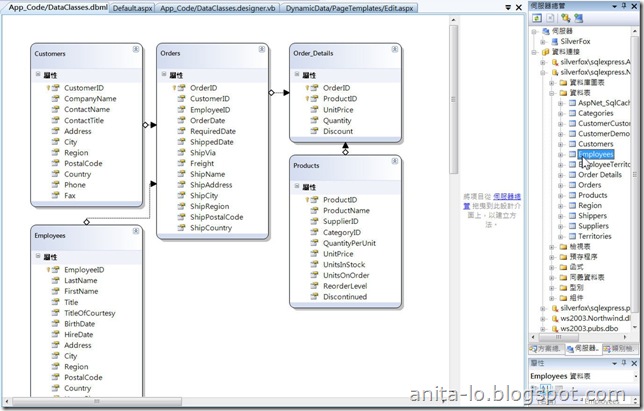
2.伺服器總管連到Northwind資料庫, 並將必要的資料表拖拉到Link to SQL 類別的設計視窗.

設計Link to SQL

3.接著修改Global.asax的程式碼, 移去下面這行程式的註解, 並修改"YourDataContextType"為第一步驟加入的Link to SQL的類別名稱, 以及設定ScaffoldAllTables 屬性為True即可.

model.RegisterContext(GetType(DataClassesDataContext), _
                      New ContextConfiguration() With {.ScaffoldAllTables = True})

執行結果:

執行結果1 - 資料表名稱

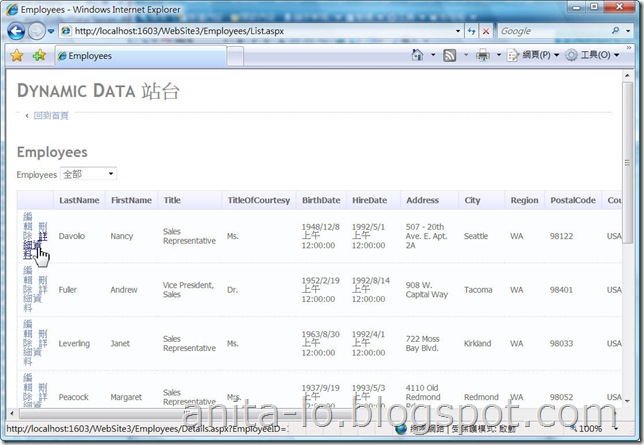
點選"Employees"之後

執行結果2 - Employees List

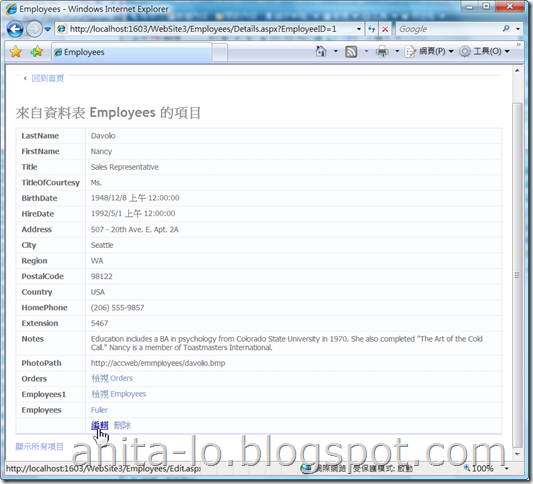
點"詳細資料"

執行結果3 - Employees Detail


相關參考: Your First Scaffold, and What Is Dynamic Data-

2008年8月12日 星期二

Visual Studio 2008 SP1 開放下載了

Visual Studio 2008 SP1 已經於8/11開放下載了.

http://www.microsoft.com/downloads/details.aspx?displaylang=zh-tw&FamilyID=fbee1648-7106-44a7-9649-6d9f6d58056e

注意事項:

  1. 最好先完成作業系統的Windows Update再安裝VS2008 SP1.
  2. 如果是Vista 請先關閉"Windows 資訊看板"
  3. 若之前曾安裝一些Beta 版的相關軟體, 請先移除.
  4. 如果還是裝不起來, 請先閱讀上面Link頁中的ReadMe